Simple Workflow Between Aftershoot & Lightroom
Post-production has always been the real bottleneck for photographers. Shooting a wedding or portrait session is one thing, but sorting and delivering images on time is another. That’s why hybrid workflows have quietly become the new norm.
In fact, according to our Great Workflow Revolution 2025 Photography Report, 81% of photographers say they’ve reclaimed their work-life balance by adopting a hybrid setup: using AI tools like Aftershoot for culling, editing, and retouching, then finishing the creative work in Lightroom (and Photoshop when needed). The time saved with AI tools allows you to focus more on your creative finesse that clients hire you for.
This guide walks you through exactly how Aftershoot and Lightroom fit together so you can spend less time behind the screen and more time creating.
TL;DR: Workflow Between Aftershoot and Lightroom
- Cull smarter: Use Aftershoot to eliminate duplicates and rejects in minutes, not hours.
- Edit with AI first: Apply your signature style across your gallery and bring the edited files into Lightroom for color grading, creative looks, and client-ready polish.
- Retouch in bulk: Export your edited photos to Lightroom to add your final polish. Use AI retouching to smooth skin, fix blemishes, and remove flyaways to get you 90% there.
- Optional Photoshop: Reserve Photoshop for advanced retouching, if required.
- Why it works: This hybrid workflow combines Aftershoot’s speed with Lightroom’s creative control — saving hours per shoot and giving photographers more consistent results and faster turnaround.
Try Aftershoot 30 days for free and see the difference yourself. Claim your free trial↗
How to Cull Faster in Aftershoot?
Lightroom is a powerful and robust software designed to make global changes to photos. From cropping to adjusting color balance to more advanced photo editing techniques, you won’t find another software that does it better if you really need to fine-tune your images.
While Lightroom offers basic tools for culling, such as flags, star ratings, and color labels, it lacks advanced automation features that can speed up the process.
Culling in Lightroom can be time-consuming, especially with large batches of photos, as it requires manual inspection and sorting. Unlike AI-based culling tools like Aftershoot, Lightroom doesn't automatically analyze images for factors like sharpness, duplicate detection, or closed eyes. This means photographers often spend significant time and effort going through hundreds of photos individually, which can slow down the workflow and extend the post-production timeline.
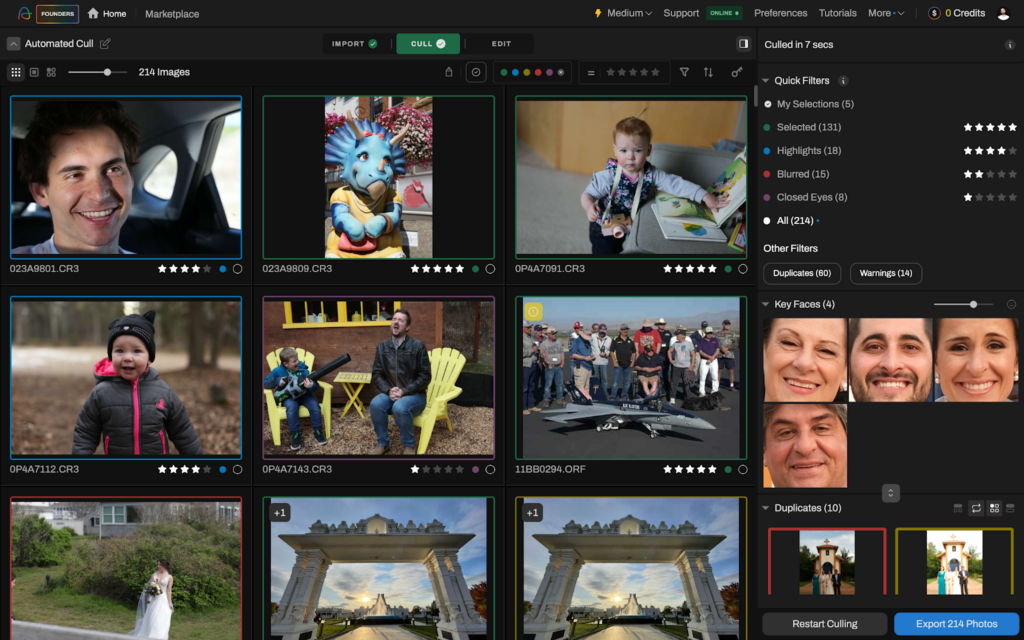
This is where Aftershoot shines. Using the power of AI culling, Aftershoot will group duplicate images, blinks, and blurred photos.
Many photographers take hundreds or even thousands of photos in a day’s work, and Aftershoot saves them many hours of painstakingly selecting photos one by one to find the best of the series.
Aftershoot is the premier photo culling software that makes it easy for you to edit less and create more. It's super simple yet powerful enough to slash your workflow by hours each week.
We've helped thousands of photographers improve their workflow and make more money doing what they love to do: take photos!
How to get your photos from a Lightroom Catalog into Aftershoot and then back into Lightroom?
Watch the video below to see the simple workflow between Aftershoot & Lightroom.
Justin Benson, Aftershoot's Co-founder will walk you through:
- How to be sure you are in the right place in your catalog
- How Lightroom saves your edits
- Importing photos from Lightroom to Aftershoot
- How to use Library Mode
- Saving the metadata to your files in Lightroom
- Exporting your edited photos from Lightroom to Aftershoot
- Running AI culling in Aftershoot
- Importing your culled files from Aftershoot back into Lightroom
- How to update the metadata
Workflow between Lightroom to Aftershoot: Editing and Moving Images
In your Lightroom catalog, click on Catalog Settings, click on the Metadata tag on the top right tab, and make sure “Automatically write changes to XMP is checked.” This makes sure that every change you make to the original photo is saved to the XMP sidecar file, NOT the original photo.
Then you can begin your usual workflow of editing images in Lightroom.
OR even better, you could use Aftershoot EDITS from the start to cull your unedited images and then automate your entire editing process to have thousands of images ready for delivery in mere minutes!
When you are done editing in Lightroom, it’s time to take them into Aftershoot.
Go into Library Mode to select your images and be sure you are viewing the photos in the Grid View. You must be in Library Mode and in the Grid View to save the metadata from all your files!
Choose Save Metadata to Files and allow Lightroom to make those changes to the XMP files.
Navigate to Aftershoot, add a new folder to import the edited images, and run your cull in Aftershoot. When Aftershoot's AI culling is completed, go back into Lightroom, make sure all the photos are still selected, and click Metadata from the menu.
Then click Read Metadata from Files, and Lightroom will update the changes you made in Aftershoot, such as star ratings and color ratings.
Also Read: How to Quickly Cull Photos with Aftershoot.
Workflow between Lightroom to Aftershoot: Retouching
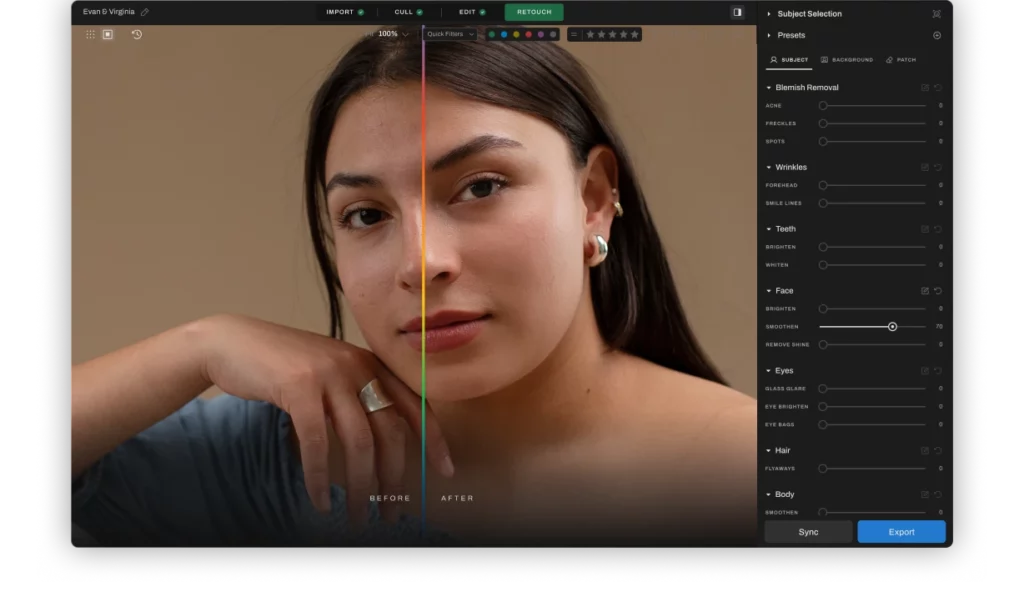
Aftershoot’s Retouching is designed to slide right into your Lightroom workflow. Think of it as your retouching assistant that gets your 90% there by cleaning up repetitive retouching tasks like removing blemishes, acne, flyaways, etc.
Here’s the practical flow to follow:
Cull in Aftershoot – Knock out the rejects and duplicates in minutes instead of hours.
Retouching with Sliders or Presets – Let AI handle the boring fixes: blemishes, flyaways, glare, wrinkles, and other small distractions that eat up your time.
Export back to Lightroom – Open those polished files in Lightroom, where you can focus on the fun part: color grading, artistic edits, and client-specific looks.
Finish in Photoshop (if needed) – For heavy retouching, composites, or commercial work, this is where Photoshop earns its keep.
Here's a quick video guide to walk you through it step by step on how to export your photos to Aftershoot directly from Lightroom
This hybrid retouching workflow is the smartest way to work. Aftershoot takes care of consistency and speed and Lightroom gives you flexibility and creative control. Instead of spending hours on repetitive touch-ups, you get to put your energy where it matters most — crafting a final look your clients can’t stop talking about.
Speed up Your Workflow by Using Aftershoot & Lightroom
The smartest workflows aren’t about choosing one tool over another — they’re about using each tool where it’s strongest. Aftershoot handles the high-volume, repetitive work that drains your time. Lightroom gives you the flexibility to shape your style and deliver the creative vision your clients expect.
By stacking these tools together, you’re not just saving hours — you’re building a workflow that’s faster, more consistent, and still 100% yours.
If you’re ready to stop spending weekends on cleanup and start focusing on the edits that actually matter, start your free 30-day trial.