
How to Cull Wedding Photos in Half the Time (and Deliver an Unforgettable Gallery)
As a wedding photographer, I used to spend hours – usually entire evenings – going through thousands of photos after each wedding. I’d open Lightroom and slowly work my way through the set, second-guessing choices and chasing consistency. It was one of the most time-consuming parts of my culling workflow, and also one of the most important ones.
Almost every photographer who's been in the field for a while can agree with this Redditor. Being great, selective, brutal editors of your own work is exactly as difficult as it sounds. That's exactly why hybrid culling workflows (AI+me) work so well for me.
Since switching to Aftershoot, my wedding photo culling time has dropped dramatically. What used to take me 3–4 hours now often takes less than 30 minutes and that includes the time I spend refining my final selection. It’s not just about speed either; having an AI-powered tool that still gives me full control over the final gallery has made a huge difference.
TL;DR: Quick Takeaways
- Cull in logical sections (by lens, camera, or moment) for efficiency and better storytelling.
- Let Aftershoot’s AI do the first heavy pass—grouping, flagging blinks and duplicates—but always review highlights and family shots manually.
- Work backwards through each scene; the best moments are often at the end of each burst.
- Be bold about cutting: clients value a tight, intentional story over “every decent shot.”
- Realistically, with a hybrid workflow, you can go from “massive backlog” to “curated gallery” in an hour.
In this guide, I’ll walk you through how I use Aftershoot to cull wedding photos — from setting up your preferences to reviewing your selections efficiently.
My Culling Workflow Before Aftershoot
Photo culling used to be one of the most time-consuming parts of my workflow. After a wedding, I’d import everything into Lightroom and begin the slow process of going through thousands of images one by one — checking focus, comparing similar frames, and trying to make consistent choices. It often took hours, and it always felt like a bit of a slog.
I’ve written more about that process in my guide to culling photos in Lightroom, which gives a breakdown of how I used to do things manually.
But it boils down to this:
| Approach | Control | Speed | Missed Key Shots | Who It Suits |
| All-Manual | Absolute | Slow: 3–8 hours | Sometimes | Beginners, small events |
| AI+Manual Hybrid | Still absolute | Fast: 30–60 minutes | Rare | Busy pros, storytellers |
| 100% AI/Auto | Lower | Fastest: 15–30 min | More likely | Bulk, low-emotion jobs |
For me, AI plus my final pass is the clear winner. I get my evenings back without ever compromising the story or the details that matter.
Read also: 13 Best Photo Culling Software for Photographers
The Difference With Aftershoot
Since switching to Aftershoot, the process feels lighter. The AI handles the first pass — grouping similar shots and flagging the best ones based on focus, expressions, and overall quality. I still go through and fine-tune the final selection, but the most repetitive part is taken care of.
What used to take three or four hours now takes me around 20 to 30 minutes to cull wedding photos. That time saved makes a big difference — not just for productivity, but for staying focused creatively.
And because Aftershoot runs locally, there’s no need to upload anything to the cloud. Everything stays on my machine, and I’m always in control of the final gallery.
How I Cull Wedding Photos with Aftershoot: Step-by-Step Workflow
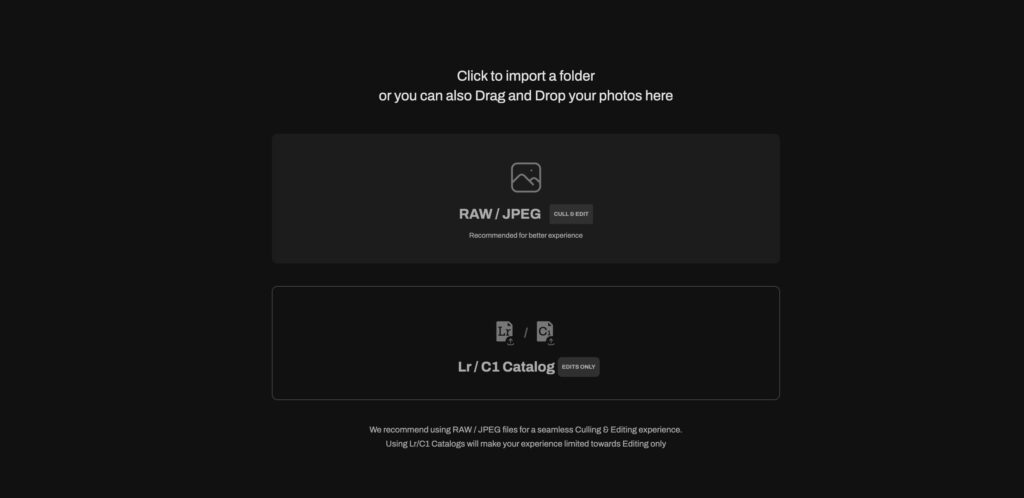
Step 1. Importing Your Photos
Before you begin culling in Aftershoot, the first step is getting your images into the software. Aftershoot offers a few flexible import options depending on your workflow:
- Direct from a Memory Card: You can import photos straight from your memory card. Aftershoot will copy the files to your chosen working folder, with the option to simultaneously back them up to a second location. Ideal for keeping your files safe from the outset.
- Import from an Existing Folder: If you’ve already transferred your images to your computer, you can select a folder and bring the files into Aftershoot.
- Drag and Drop: My own method, you can simply drag and drop your image files or folders into the Aftershoot window. Once dropped, the software will automatically begin analyzing and preparing them for culling.
Whichever method you choose, Aftershoot starts working in the background almost immediately.
Step 2. Choosing Your Culling Mode
Once your images are imported, the next step is choosing how you’d like Aftershoot to help you cull them. The software offers two distinct culling modes, designed to match different preferences and workflows—whether you want full control or are looking to save time with a more automated approach.
- AI-Assisted Culling:
This mode is perfect for wedding photographers who like to stay closely involved in the culling process but still want to benefit from the speed and intelligence of AI. Aftershoot helps by grouping similar or duplicate shots, highlighting variations in facial expressions, and suggesting key moments worth keeping. From there, you can review, refine, and make the final calls yourself—ideal if you want to maintain a personal touch while still working efficiently.
- Automated AI Culling:
If you’re looking to streamline your workflow and reduce hands-on time, this mode is for you. Aftershoot handles the bulk of the decision-making automatically, based on your preset preferences. It selects the sharpest images, filters out blinks, misfires, and blurred shots, and delivers a neatly curated selection for you to review. It's especially useful for high-volume shoots or busy wedding photographers who need to turn around galleries quickly.
Both modes are powered by Aftershoot’s smart algorithms. You can easily switch between modes depending on the shoot, the client, or even your mood that day.
And if you prefer to do everything yourself, Aftershoot also gives you the option to cull manually — offering a flexible space to view, compare, and flag images without AI assistance.
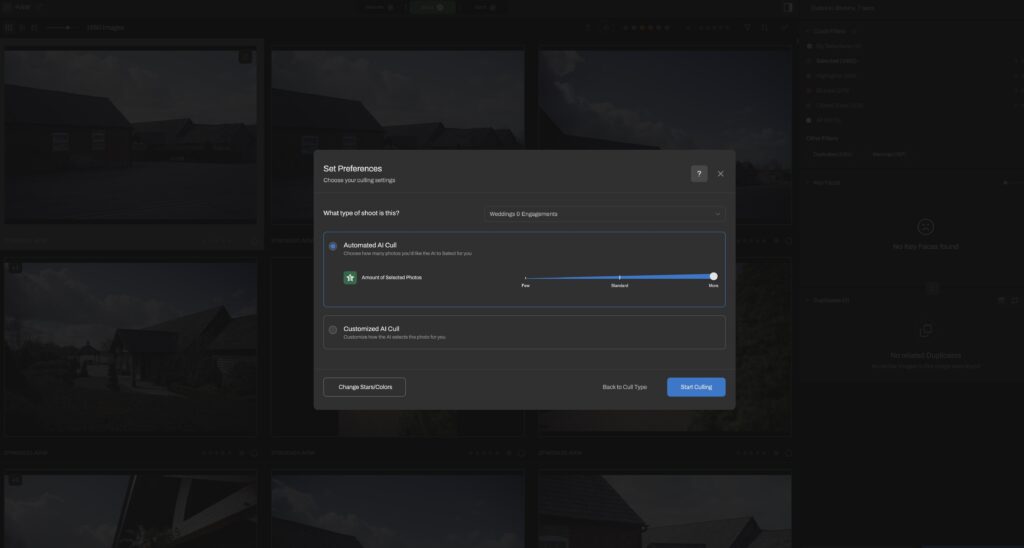
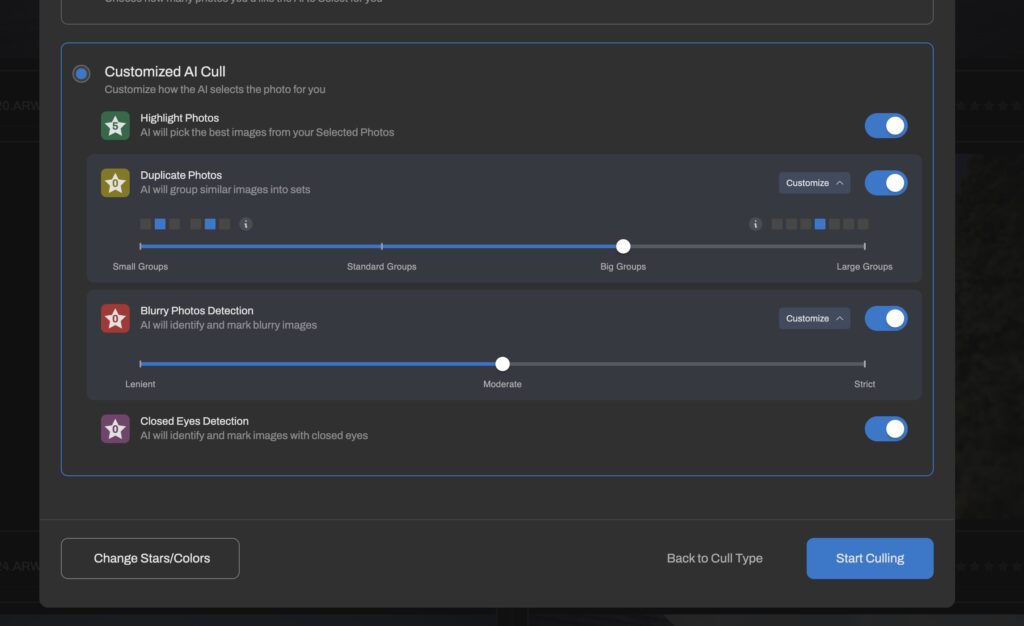
Step 3. Setting Culling Preferences
Aftershoot allows you to customize culling settings based on your preferences. The following options determine how strict or lenient the software is when you cull wedding photos:
Blur Detection
- Lenient – Keeps more images, even if they’re slightly soft, ideal for photographers who prioritize emotion over technical perfection.
- Moderate – Balances sharpness and creativity, allowing for some slightly soft shots if they add value.
- Strict – Only keeps the sharpest images.
Personally, I choose moderate for balance.
Duplicate Grouping
- Small – Groups fewer images together, allowing for subtle differences in expressions and moments to be retained.
- Standard/Big – A balanced setting that groups images efficiently without being too aggressive.
- Large – Groups more images together, selecting fewer from each set, ideal for photographers who shoot many similar frames.
My personal setting is ‘Big’, as I often have duplicated images to cull, but want to see the small changes.
Automated AI Cull - Duplicate Selection
- Few – Selects the smallest number of images from duplicate sets (e.g., 1 out of 10).
- Moderate – Selects a middle-ground number of images (e.g., 2 out of 10).
- More – Selects a higher number of images (e.g., 3 out of 10), useful for photographers who like to have more choices.
Sneak Preview Selection
If you want a quick selection of images for social media or client previews, Aftershoot can generate a set of sneak peeks based on trending photography styles. You can choose to keep this feature off or select up to 20% of the images for a sneak preview selection.
Once you’ve set your preferences, click Start Culling and let Aftershoot do its work.
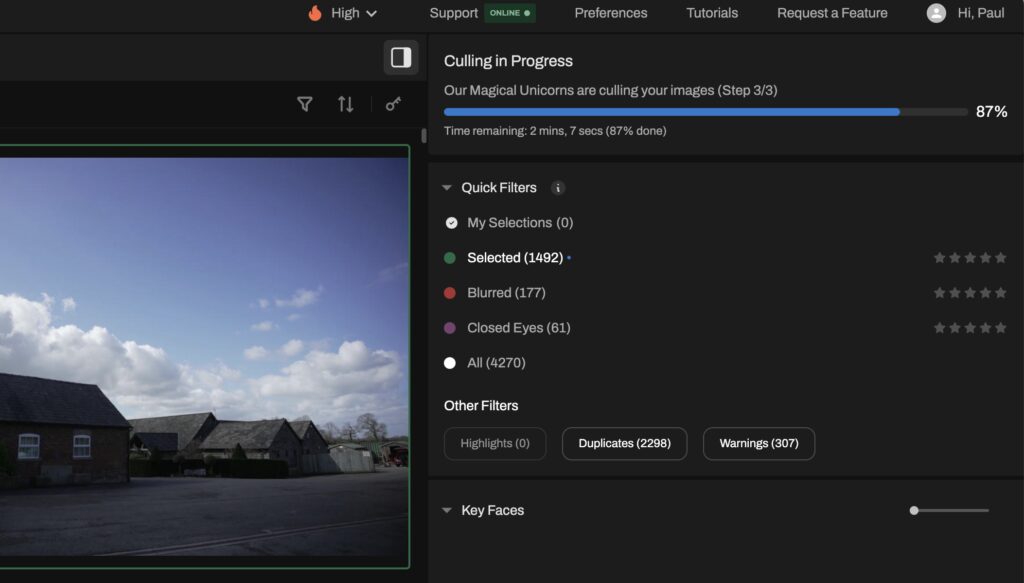
Step 4. Reviewing Aftershoot’s Selections
Aftershoot’s AI does a remarkably good job at identifying the best images from a set, but as photographers, we still want the final say. This stage is where you review the AI’s decisions, refine the selection if needed, and ensure that nothing important gets missed.
Once the AI culling process is complete, your images are automatically organized into easy-to-navigate categories based on your preferences:
- Selected – These are the shots Aftershoot believes are the strongest, based on sharpness, facial expressions, and overall composition. Think of these as your starting shortlist.
- Blurred – Images that are soft, out of focus, or suffer from motion blur end up here. It's always worth skimming through this folder quickly—especially for moments where a bit of softness might still tell the story beautifully.
- Closed Eyes – Any images where one or more subjects have their eyes closed are grouped here. It's incredibly useful for portrait sessions and wedding moments like group shots or speeches.
- Duplicates – Similar frames are grouped together, so you can choose the one with the best expression or composition without flicking back and forth manually.
"Backward culling," a little trick that always works for me
I cull each section backwards. Instead of starting at the first frame after the processional or the first shot in a bridal portrait burst, I jump to the end of each scene and work my way to the start.
Why? Most of my best images, in terms of connection, posing, even lighting, happen near the end of any sequence, when my subject is relaxed and I’ve dialed in the light and framing.
By culling backwards, I instantly spot my favorites and can skip past weak, repetitive, or warm-up frames. This habit alone has cut hours off my total culling time, and it’s one of the main reasons I can confidently deliver a tighter, more intentional gallery.
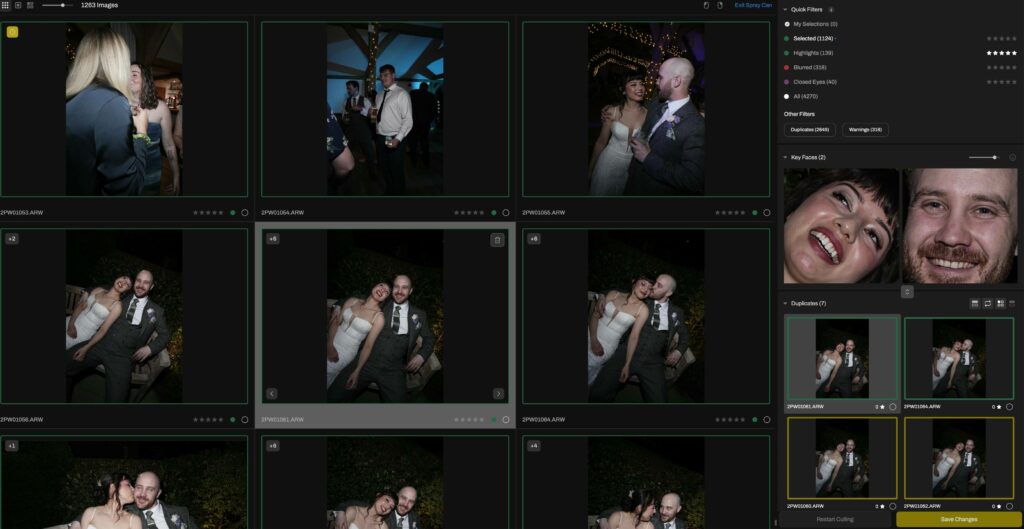
Step 5. Staying in Control of Your Selections
One of the biggest strengths of Aftershoot is that, while the AI does the legwork, you're always in full control of the final outcome. Whether you agree with the AI’s decisions or want to make your own creative tweaks, you can override selections at any point in the process when you cull wedding photos.
If you spot an image the AI didn’t mark as a ‘Select’ but you know it belongs in the final gallery, you can manually promote it with a click. Likewise, if the AI included a shot you don’t feel fits the story, you can remove it just as easily. This hands-on flexibility ensures your final cull reflects your eye, not just the algorithm.
For even faster reviewing and refining, Aftershoot offers a handy ‘Spray Can’ tool. It works much like the classic Lightroom version—allowing you to rapidly tag or untag images as ‘Selected’ simply by hovering and clicking. It’s an ideal way to breeze through large sets and fine-tune your selections on the fly, without breaking your flow.
This level of manual control ensures that every image you deliver feels intentional and aligned with your creative voice.
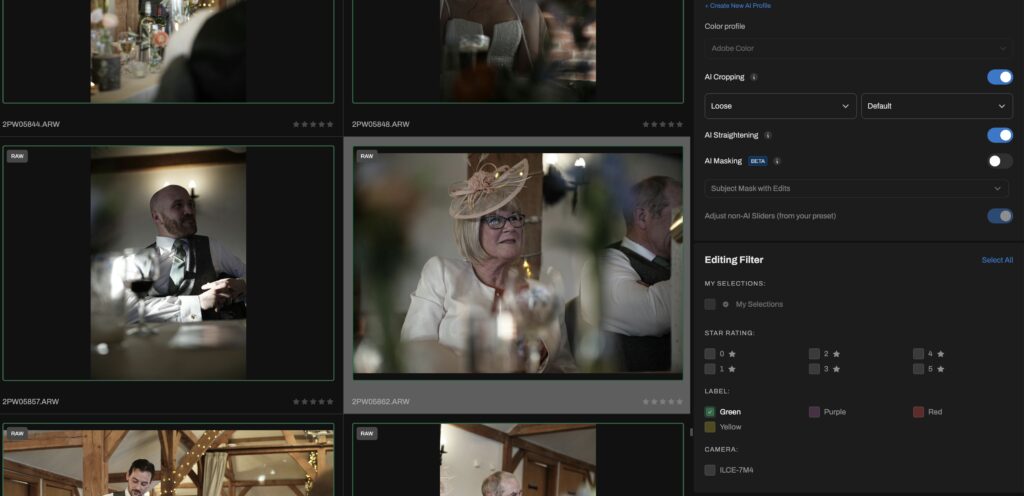
Step 6. Editing with Aftershoot
Once I’ve completed the cull and made any necessary refinements, I move straight into editing—all within Aftershoot.
Aftershoot’s AI editing tools allow me to apply my own personalized editing style to an entire gallery in minutes. The software learns from the way I edit whether that’s exposure adjustments, colour preferences, or subtle tone shifts and applies those choices consistently across every image. It’s like having a second version of me doing the initial edit pass, which has been a massive time-saver.
Because I’m working in the same space where I culled the wedding images, I don’t need to waste time switching between programs or re-organizing files. Everything’s already in place: selections, metadata, ratings—it’s all carried through seamlessly. The result is a more focused, efficient wedding workflow that still keeps creative control firmly in my hands.
Once the AI edit is complete, I can review the results, make any final tweaks, and then export the files for delivery or for further refinement in Lightroom if needed.
Read also: A Complete Guide to Photo Editing Workflow
Why Aftershoot is the Best Culling Tool for Wedding Photographers
As a wedding photographer, I need speed, accuracy, and control over my selections. Aftershoot delivers all three by:
- Cutting Culling Time: Aftershoot drastically reduces the time I spend culling, handling the bulk of the work in just a fraction of the time. What used to take hours can now be done in minutes, freeing up time for the creative aspects of my workflow.
- Ensuring I Never Miss a Key Moment: The AI is trained to identify key moments, sharpness, and facial expressions, ensuring that I never miss an important shot—whether it’s a fleeting emotion or the perfect composition.
- Giving Me Full Control Over the Final Selection: Aftershoot does the heavy lifting, but I still have complete control over the final selection. I can fine-tune my gallery, adding or removing images as I see fit, ensuring the final collection aligns with my vision.
If you’re still manually culling in Lightroom or another program, I highly recommend giving Aftershoot a try. It will transform your culling workflow and save you valuable hours, allowing you to focus on what truly matters — creating beautiful wedding stories.
You'll only know what works for you when you test it in your own workflow. Aftershoot offers a 30-day free trial so you can test your cull-edit-retouch workflow and find your best workflow.
FAQs
How many images do you actually deliver per wedding?
For me, 1,000–1,300 is the sweet spot. I’d rather my clients see their story than get lost in endless ‘just okay’ frames.
Does AI ever miss a must-have shot?
It gets the vast majority right, but I always check family formals, emotional beats, and unique guest moments myself. The software is a time-saver—not a replacement for my experience.
What's your best tip for those just learning culling?
Cull with your client’s experience in mind. Don’t just look for “keepers”—look for a story that flows, omits repetition, and feels intentional start to finish. "Culling backwards" is a very helpful way to do this.